
Having technical problems can be upsetting in the modern digital world, where websites and internet platforms are essential to our daily life. The HTTP 403 error is only one of the many problems that consumers experience. You may have questioned what this issue means and how to fix it if you've ever run into it while surfing the internet.
When you tried to view any web page or website, you must have encountered HTTP 403 forbidden.
“403 Forbidden- You don’t have permission to access ‘/’ on this server”
Wondering, what is an HTTP 403 error.
Yes! Well, An HTTP 403 error is a status code that indicates the server understood the request but refuses to authorize it. It is nothing but an HTTP 403 code status code that pops up when we try to access a page and forbids us to view that source. But due to these sorts of 403 errors, one can lose many potential customers if this error is not fixed at the earliest. In this blog post on 403 errors, we have tried to cover all the essentials about “What is 403 forbidden Error Messages”
A website development company recognizes the value of a flawless online experience for both consumers and organizations and can assist you in resolving them swiftly and efficiently.

Learn How to Fix HTTP 403 Errors?
The 403 forbidden error appears when attempting to access a web page. If the HTTP 403 Forbidden message appears in your browser, it indicates that you are not authorized to access the specified web page or URL. Even when you try to log in to midclass same error occurs so here is the solution. What is the cause of HTTP Error 403 Forbidden Message? And how can you fix them effectively?
While creating a new website to host your content and put it into live, you get a mail saying “Hey, is there a reason I see this when I click on your website?”
It tends to be a disturbing error since you are doing much to attract the audience. But these HTTP errors 403 may cause loss of potential customers who are clicking your website but getting this message in return. This error looks something like this:
The HTTP 403 errors generally appear when attempting to access a web page. If the '403 Forbidden' message appears in your browser when you are not authorized to access the specified URL for some predetermined reason.

The 403 Forbidden error relates to an HTTP status code which generally happens when the web page (or other resources) that you’re trying to open in your web browser is a resource that you’re not allowed to access.
It means that the server is refusing to take any action even after understanding your request.
Website designers can customize how a 403 error looks just like 404 errors and 502 errors!
403 errors look different in different web servers. Websites even use slightly different names for this error. The most common incarnations of 403 Forbidden errors are as follow:
HTTP 403 forbidden error is commonly encountered due to a client-side setup issue, which can usually be resolved independently. One of the primary reasons behind a 403 forbidden error is the configuration settings applied to a specific folder or file. These settings determine the access privileges for different users, such as read, write, or execute permissions for that particular resource.
In this situation, the owner of the website may have:
There are several other possible causes for a 403 forbidden error, including:
Any of these causes could be responsible for the 403 forbidden error on your website.
Here are a few client-side errors that are related to the HTTP 403 Forbidden errors such as:
Methods For Fixing the HTTP Errors 403 Forbidden message.
Now, it’s time to look down at the solutions to get rid of this error message. We will take you through the working steps that you can execute to resolve this error without any hesitation.
Most people are not familiar with the .htaccess file. It’s because the file remains in the “hidden in the project directory”.
.htaccess is basically a server configuration file and mainly works by altering the configuration on the Apache Web Server settings.
However, you can access them easily if you are using the Hostinger File Manager.
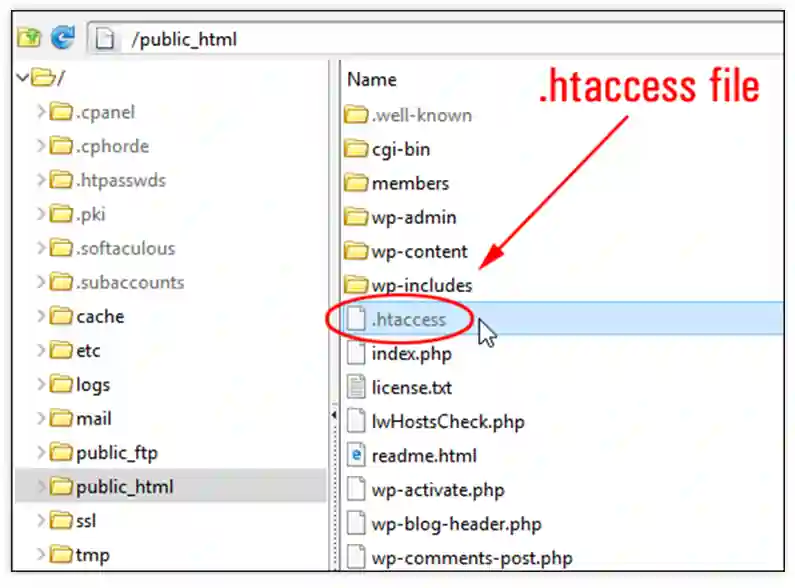
In case you are not using Hostinger File Manager, or let’s say if you’re using C Panel in place, you can access the .htaccess file hosting Control Panel with the help of File Manager. Below are the steps involved:
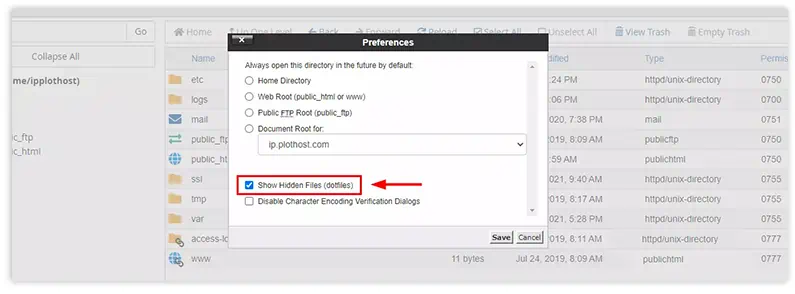
If you are not able to find such a file though, then click on the settings and enable Show Hidden Files (dotfiles) option from there
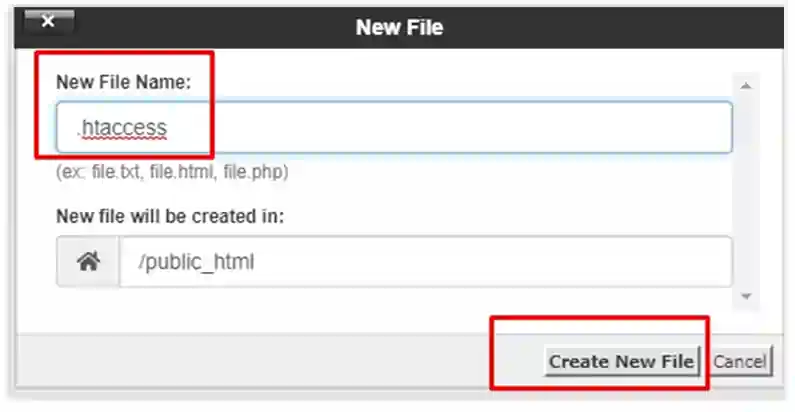
In case, if your website lacks the file and you don’t have a .htaccess file detected, you can create it through the manual approach. As discussed, as soon as you found the .htaccess file, you need to follow the following steps:

In case, this doesn’t work out, move onto the next discussed steps:
Explore an in-depth guide on how to fix 500 errors.
Remember when files are created, they always come up with some default permissions. This bad permission is what led to a Http Error 403 forbidden message. They control all the files and folder activities such as how you can read, write and execute the files for your use.
If you are using Hostinger, download Fix File Ownership to take care of all your permission problems in just a single click.
Not only it will save your time but also will restore all file and directory permissions to default values.
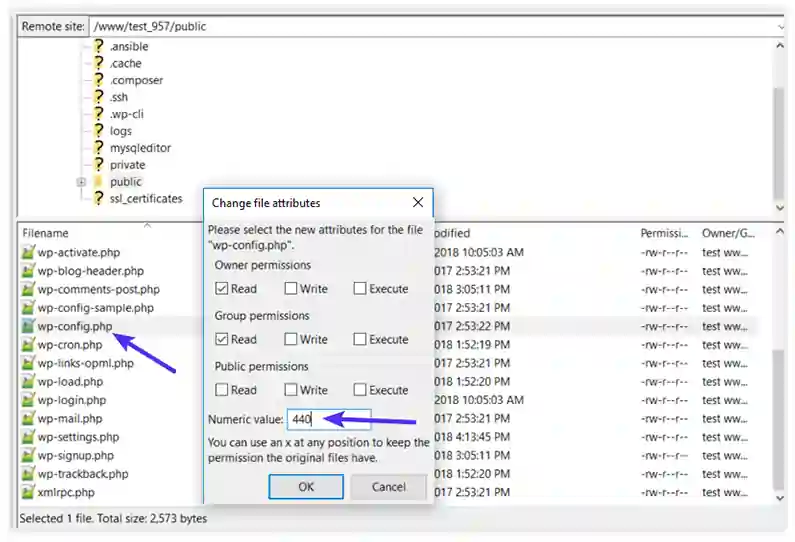
However, you can use FileZilla FTP to edit file and folder permissions. To get started, you should follow the following steps:
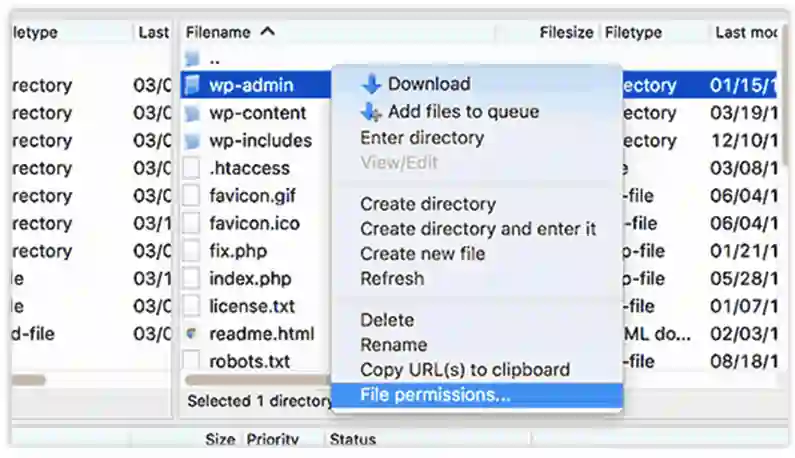
Next, check the Apply to directories the only option and enter permission 755 in the numeric value field provided, and finally press OK.
Once the FileZilla is done changing folder permissions, repeat step 3 again. But remember, you have to choose to apply to files only option this time. Then enter the numeric value 644 in the provided field.
If the error is not resolved/ looks down similar as before, move to the next section of the article:
If the errors are still not resolved using the above two methods, it’s high time to understand that the error is popping up over and again due to an incompatible or faulty plug-in. In this section, we will try the disabling plug-in and would check if it fixes the 403 forbidden errors or not.
Instead of going to each and every plug-in and then disabling it, it would be better to disable all the plugs- INS at once. Through this step, you would not only take less time but also will be able to detect the problem easily. Below are the following steps you need to take:
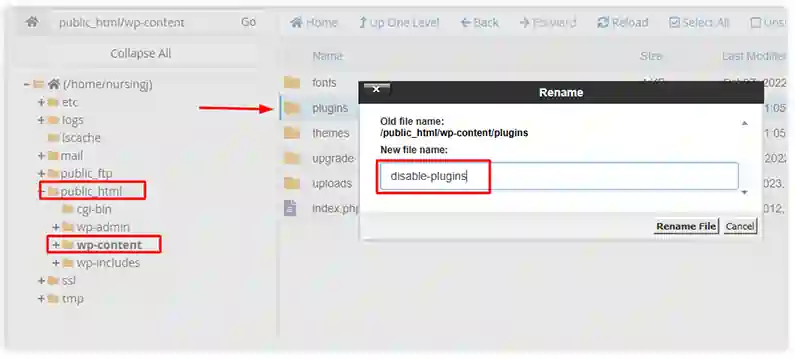
Try to access your website again after disabling all the plugins. Did it take away the problem? If yes, then the actual source of the error was the plugin only. Now, next, you need to deactivate the plugin one by one and thus have to check if your website is coming back to action or not. Thus, using this method, you would be able to detect the faulty plugin that is the root cause of the problem.
If installing a new one seems mandatory, you can choose to update the plug-in though.
If sadly, none of the methods explained above works out for you, (It’s really rare), you may need to get in touch with your hosting provider.
Another method to resolve these 403 errors is to upload an index page.
Check your website’s homepage name as it should be like index.html or index.php format. If it’s not, then simply rename the homepage as index.html or index.php.
However, if you want to keep the current homepage name, another way is to upload an index page to your public_html directory and create a redirect to your existing homepage. Here are the steps to follow for the same:
Redirect /index.html /homepage.html
ls -1 [file name]
-rearward- 1 [owner][group] 20 Jul 20 12:00 filename.txt
Look at the owner and group part, if you find different ownership, use the chow Linux command to modify file ownership. Here’s the basic syntax for chow Linux command:
chow [owner][:group] [file name]
For example, if your username is GoDaddy, use the syntax like this:
chow GoDaddy filename.txt
If you don’t feel comfortable using SSH yourself, you can contact JanBask’s support team for assistance.
Another possible cause of 403 errors is pointing to the wrong IP address, where you don’t have permission to view the content.
So, make sure to check the domain A record that your domain name points to the correct IP address.
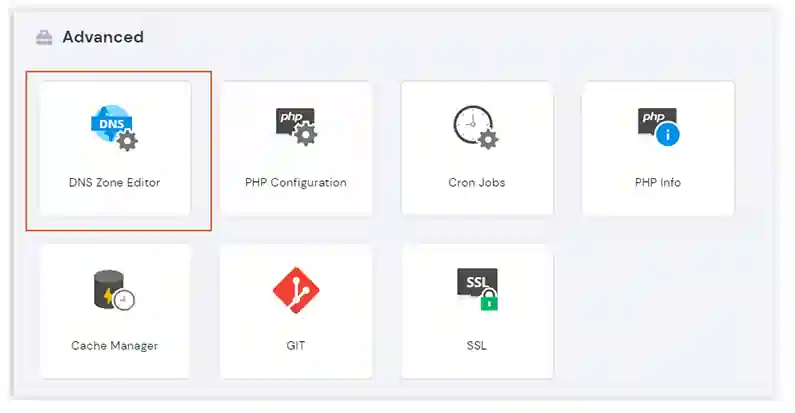
To check if the domain A record is pointed correctly, you have to access the DNS Zone Editor in hPanel:
Here are the steps to follow:
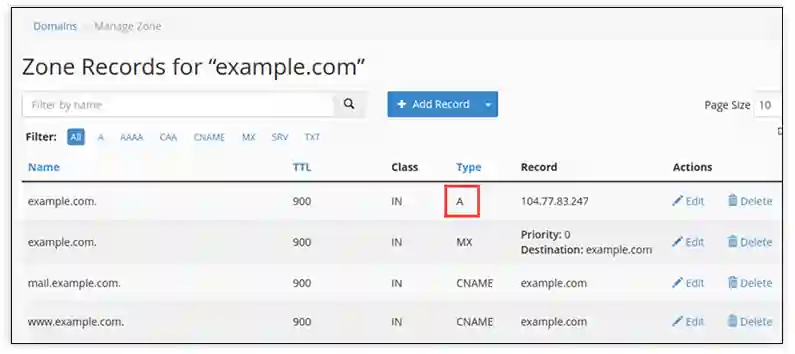
In case you don’t find the correct record, you have to create a new one from the Manage DNS records section. Make sure you select Type A and insert the correct IP address into the Points to field, then click Add Record.

Wrong nameservers also cause HTTP error 403
If you have recently migrated from one web host to another and your domain may still be pointing to your old web host.
Once the old host cancels your account, it will cause 403 errors. Therefore, 403 errors when you change the web host, make sure your domain is pointing to the right web host.
Malware can be another cause of the HTTP 403 errors.
Scan your website to identify any malware. There are plenty of security plugins that you can use for WordPress websites, such as Sucuri or WPScan, to do so.
Using security plugins you can remove malware by deleting or restoring them.
Your browser’s cache and cookies may also give rise to 403 errors. Cache stores data to make a website load faster for future visits.
However, it may be possible that the website’s link has been updated, and the actual & recent web page link is different from the cached version. So, clearing browser cache and cookies may also resolve this issue.
Follow these steps to clear cache and cookies on Google Chrome:
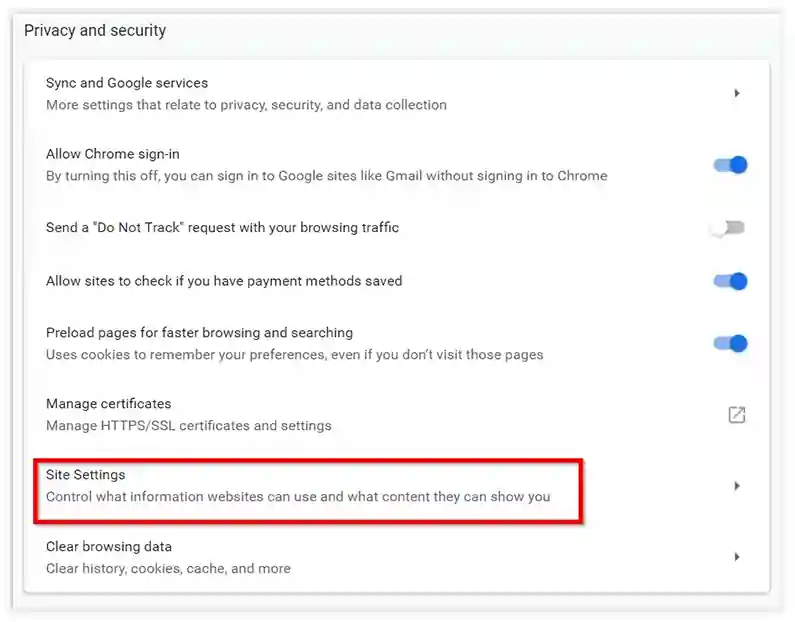
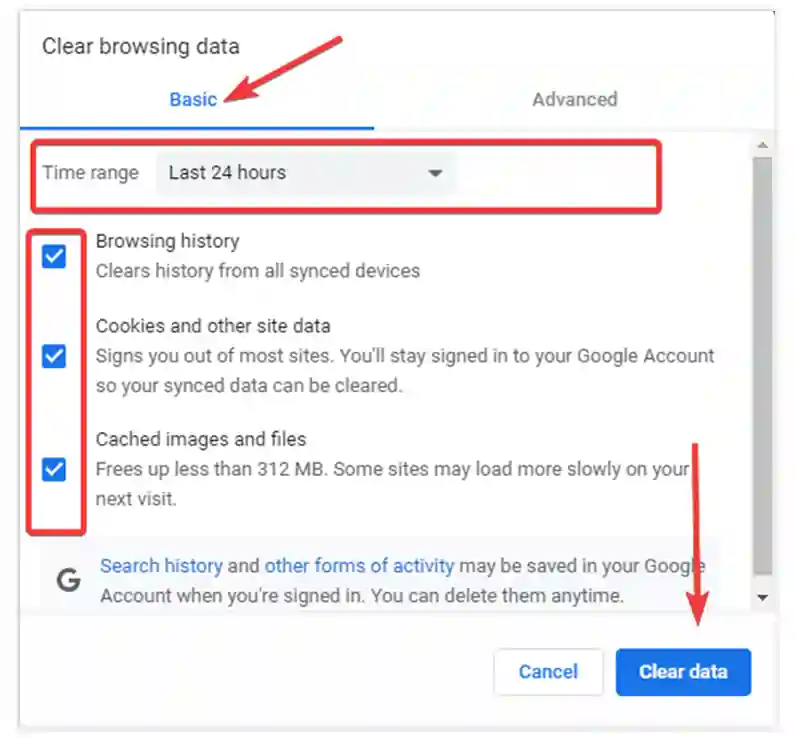
Now you are done, you can check by visiting the website and logging in if HTTP error 403 gets resolved or not.
If the above-listed methods don’t work, we recommend contacting our support team to help you get out of this issue.
Basic Tips for Visitors For Fixing the Error 403 Forbidden
Basic Tips for Website Owners For Fixing the Error 403 Forbidden
1. How do I fix 403 Forbidden?
To resolve a 403 Forbidden error, you can take the following actions:
By following these steps, you should be able to troubleshoot and resolve the 403 Forbidden error on your website.
2. What is 403 Forbidden?
A 403 Forbidden error is an HTTP status code that occurs when the server comprehends the client's request but declines to fulfill it. It signifies that the client, usually a web browser, lacks permission to access the desired resource. This denial of access can stem from factors like inadequate permissions, incorrect configurations, or restrictions imposed by the website owner. The error serves as a security measure to safeguard sensitive data and prevent unauthorized entry to specific files or directories on the server.
It's critical to comprehend and address issues with HTTP status codes like 403 Forbidden in the context of website development companies and web development services. Companies that specialize in developing websites have experience dealing with these mistakes and putting the right fixes in place. They are able to handle any configuration or permission-related issues that could be the error's primary cause and assist in identifying its fundamental cause. By utilizing their web development services, you can make sure that your website runs without a hitch and that people can access the resources they're looking for without running into 403 Forbidden issues.
3. What causes a 403 Forbidden error?
The occurrence of a 403 Forbidden error can be attributed to various factors. This HTTP 403 code typically indicates that access to the requested resource is denied. Understanding the 403 Forbidden meaning and the reasons behind the "access denied" message is essential for resolving the issue.
One common cause of a 403 Forbidden error is insufficient file or directory permissions. If the server determines that the client lacks the necessary authentication or authorization to access a particular resource, it will return a 403 Forbidden status. This can occur due to misconfigured permissions, restrictive settings imposed by the website owner, or improper setups.
In addition, conflicts with plugins or scripts, problems with server settings, incorrect server configurations, or issues with file permissions can also result in a 403 Forbidden error. The server may trigger this error as a precautionary measure to protect sensitive data, prevent unauthorized access to critical resources, or address potential security vulnerabilities.
If you encounter an access denied 403, it is important to address it promptly. To fix the forbidden 403 access denied issue, you can take several steps. First, ensure that the file or directory permissions are set correctly, granting the appropriate access rights. Secondly, review and adjust server configurations to align with the required authentication and authorization protocols. Additionally, check for any conflicts or issues with plugins, scripts, or server settings that may be causing the error.
If troubleshooting these aspects does not resolve the problem, it is advisable to seek assistance from web development services providers or professionals experienced in handling 403 Forbidden errors. These experts can analyze the specific circumstances of your website, identify the root cause, and implement the necessary fixes to restore proper access without encountering the 403 Forbidden error.
4. Can you bypass a 403 error?
It is possible to get overcome a 403 error, yes. Several methods exist for doing this:
It is crucial to remember that getting around a 403 error is frequently regarded as breaking the terms of service for the website. A 403 error might result in a website ban if it is discovered that the user has circumvented it.
It's also critical to remember that it might not be a good idea to ignore a 403 error and fix forbidden 403 access denied. If you are not careful, you can download viruses or accidentally expose your sensitive information.
It is preferable to speak with a security expert if you are unsure of how to get around a 403 error.
5. How do I fix a 403 Forbidden error in Chrome?
An HTTP status code of 403 Forbidden indicates that you are not permitted to access the requested resource. There are several causes for this, including:
Try the following solutions to repair a 403 Forbidden error if it's happening in Chrome:
Contact the website administrator if you have tried all of these solutions and you are still receiving a 403 Forbidden error.
For professional web development services or expert support in resolving such issues, you may consider reaching out to specialized web development service providers. They can offer technical expertise, solutions and 403 forbidden fix to ensure smooth access to your desired resources.
Detecting 403 errors needs patience. We understand that this error prohibits you from accessing your website and thus becomes quite irritating sometimes.
Some of the methods often overlooked which can help you to resolve the error:
Nevertheless, follow the steps of the above-explained methods one by one to bring your website back into action.
Did this blog help you understand what is 403 forbidden? Want to explore how to fix 404 errors on Google? Feel free to reach our experts at JanBask Digital Design.
Unlock the Solution for HTTP 403 Errors Now.

P
Good topic selection! Users may experience frustration as a result of HTTP 403 errors, thus it’s crucial to fix them.
B
I like how the typical reasons of HTTP 403 failures were described in a step-by-step manner.
C
The blog is well-organized, making it simple to browse the information and discover answers to certain problems.
S
The blog discusses the possible effects of 403 errors on users and companies in addition to the technical elements.
K
This blog is a thorough resource for anybody dealing with HTTP 403 problems and gives users confidence in finding a successful solution.